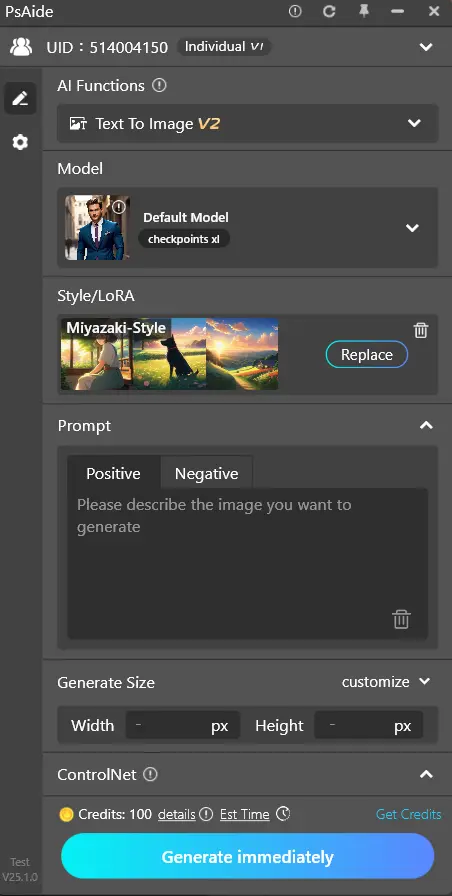
5.1 Wensheng Picture
Create a very creative image by typing a few simple prompt words.
5.1.1 Interface introduction
- Style: Select the style to generate different picture effects.
- Tip word::Enter your idea and generate creative pictures in one click.
- Generate Size: Used to set the size of the generated graph.
- Advanced settings: More advanced operation adjustments to generate effects.
- Generate results::Used to display the generated image.
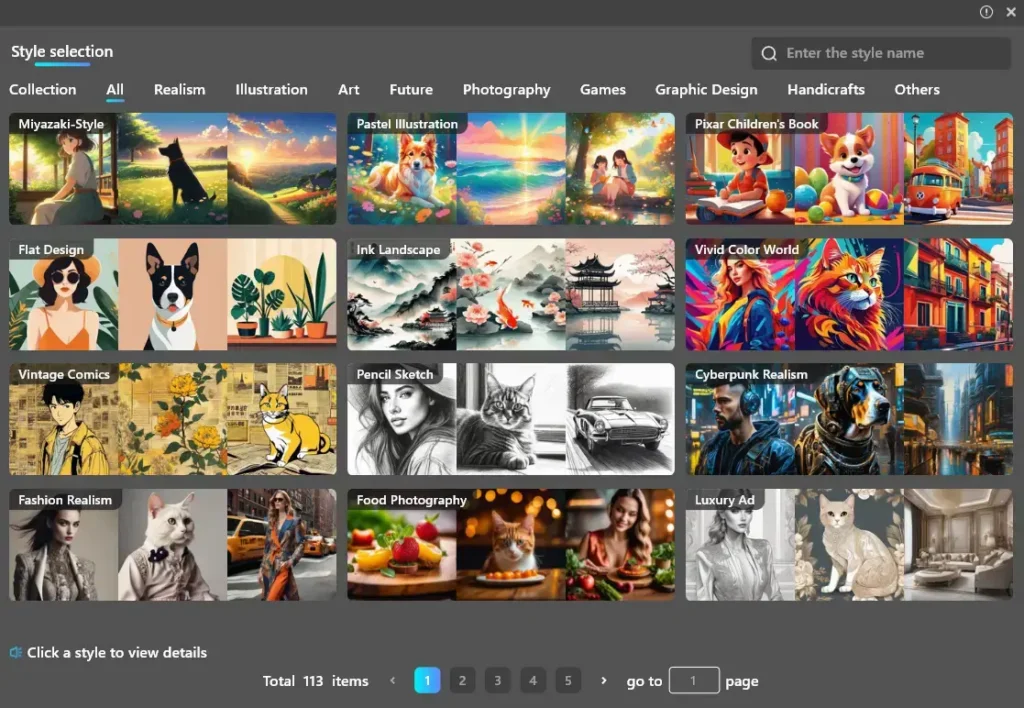
5.1.2 Style
- Click to open the style pop-up window and select the style to use with one click.
- Provides hundreds of styles to choose from to intuitively feel the style effect.
- View detailed function introduction

The more relevant the selected style is to the input prompt words, the better the generation effect is~
5.1.3 Prompt words
- Positive words: Enter the results you want to get. The richer and more precise the adjectives are, the better the results you generate.
Positive prompt words are the core content of the literary picture, and the creativity to be displayed is depicted in concise combinations of words.
For example: “Anime girl holding a brush and a drawing board in front of the window, drawing in the cartoonist studio, beautiful anime portraits, cartoon realistic style, realistic anime art style”.
No complicated sentences are needed, try to enter them in short nouns and phrases, and separate them with commas to allow AI to better understand your ideas.
- Negative words: Enter content you do not want to appear in the image to reduce interference with the generated results.
- You can use the “Clear” button in the lower right corner to clear the currently entered prompt word content with one click.
- If no keywords are entered, the AI will randomly generate a picture for you.
5.1.4 Generate size
- The size width and height can be customized, and the maximum is not exceeding 1024*1024;
- If “Follow Selection” is enabled, the generation size is the same as the selection size, and the generation result can be inserted into the selection with one click.
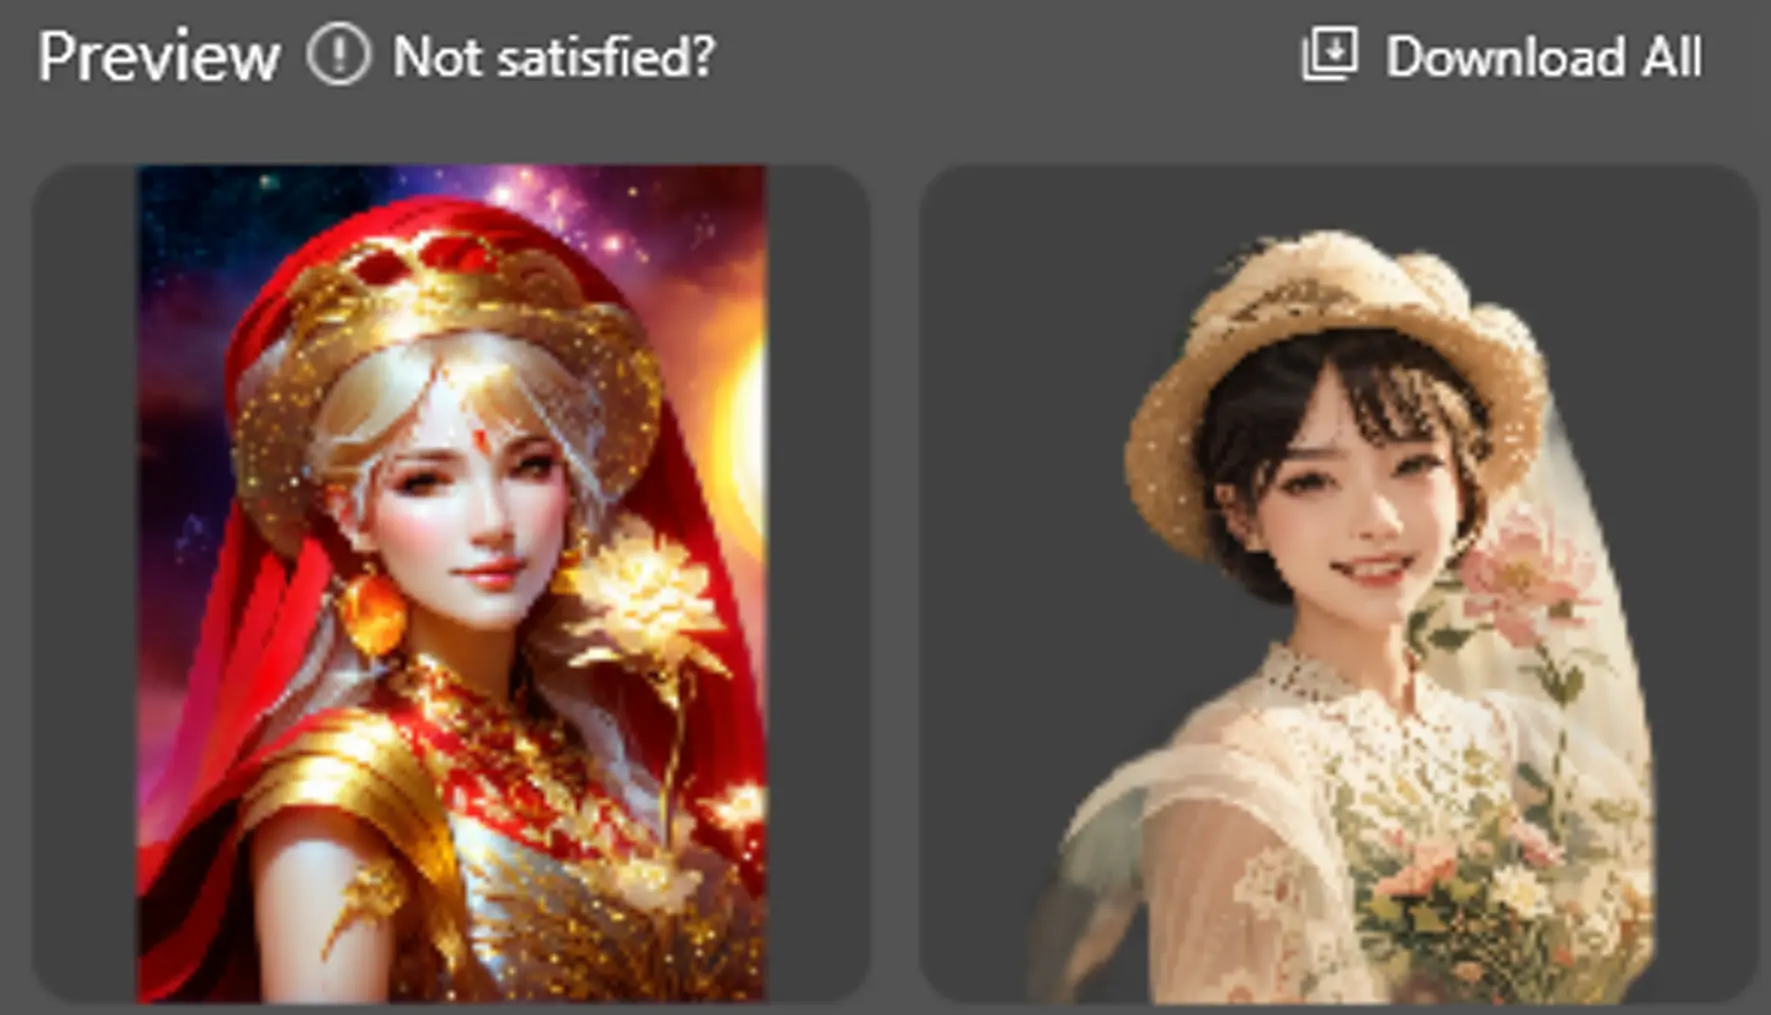
5.1.5 Generate results
If the selection is irregular, the result will be generated in a rectangle for better generation~
- Insert layer: Click on the image and it will be inserted as a new layer.
- Delete: Click the Delete button to delete the pictures in the record.
- Download:Click the download button to support saving the image locally.
- Let’s take another picture:generate a new result with the original parameters.

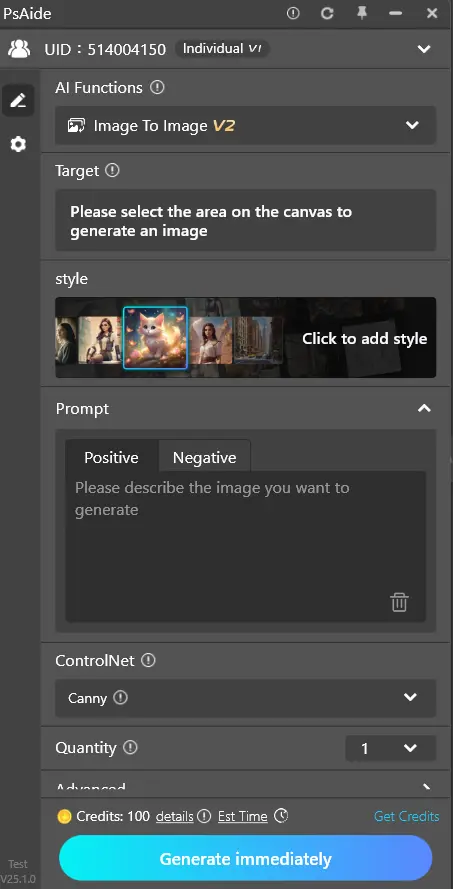
5.2 Pictures are produced
According to the selected reference area and picture control type, an image with a certain degree of similarity is generated
Effect picture
Original image
5.2.1 Introduction to the interface
- Style: Select the style to generate different picture effects.
- Screen control::Select different screen control types and flexibly control the generated screen.
- Tip word: Enter your idea and generate creative pictures in one click.
- Generate Quantity: Used to set the number of generated graphs.
- Advanced settings: More advanced operation adjustments to generate effects.
- Generate results::Used to display the generated image.
5.2.2 style
ick to open the style pop-up window and select the style to use with one click.
• Provides hundreds of styles to choose from to intuitively feel the style effect.
•View detailed function introduction
The more relevant the selected style is to the input prompt words, the better the generation effect is~
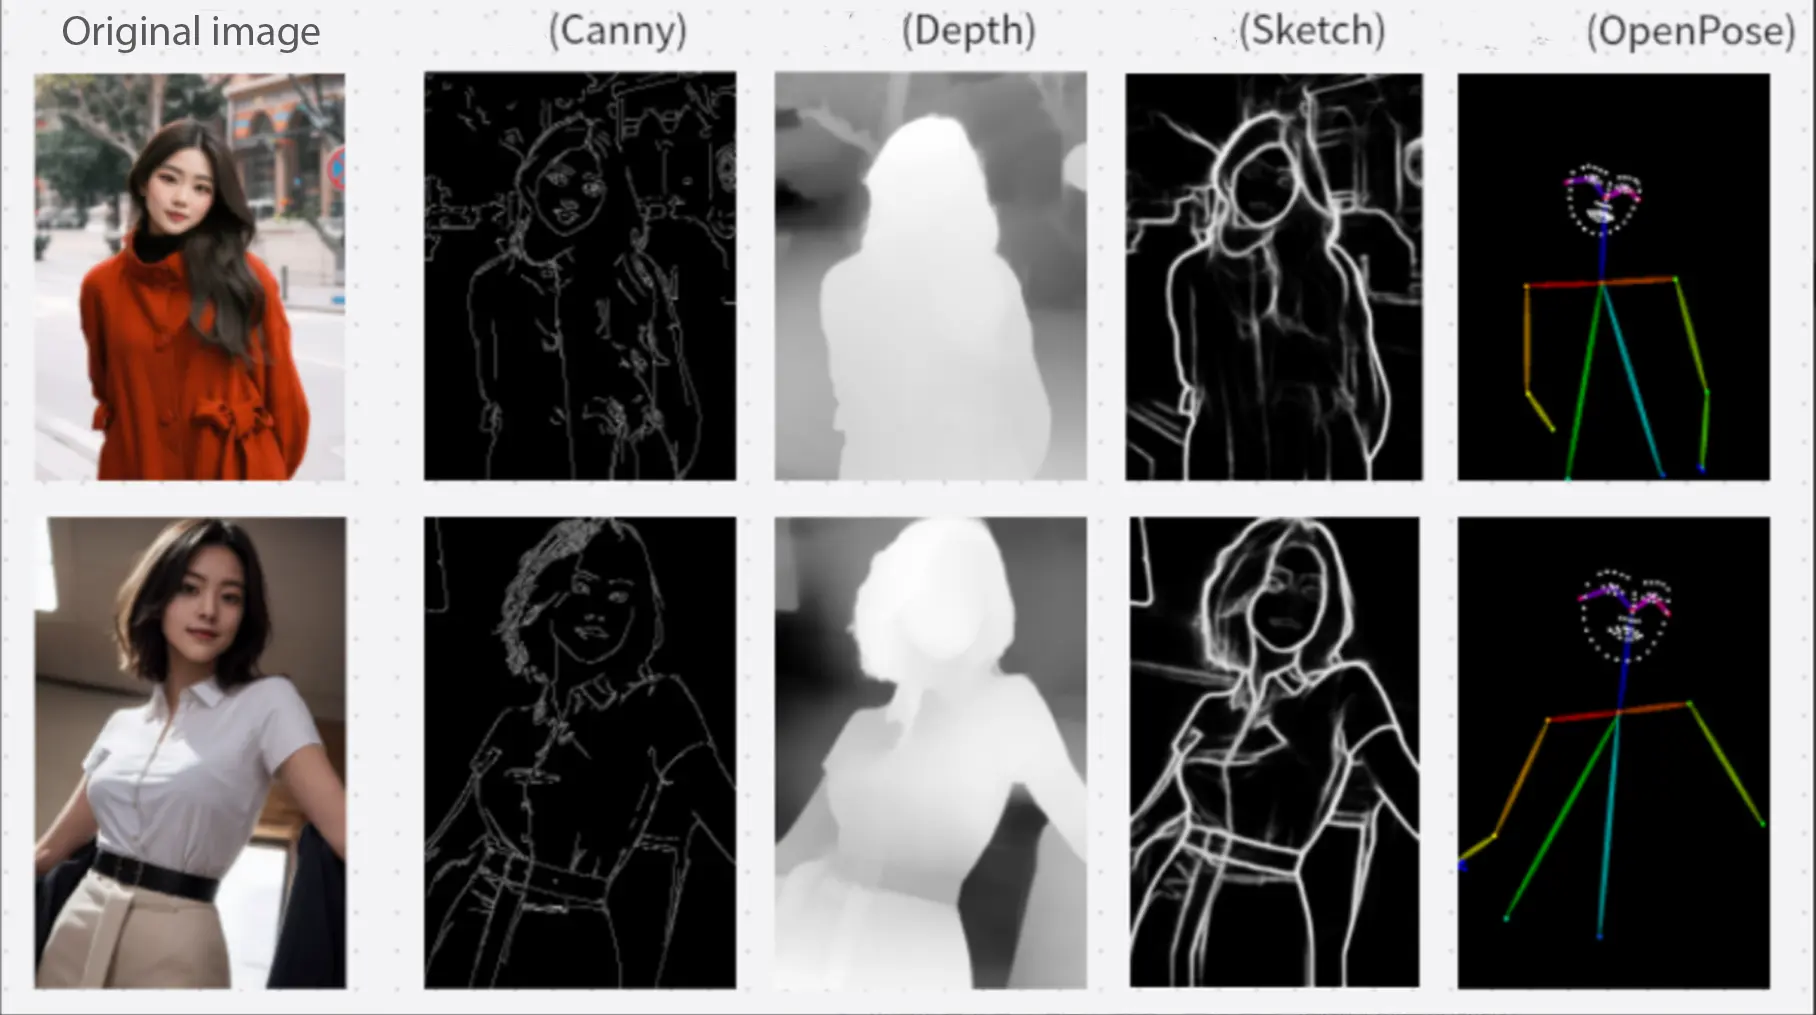
5.2.3 Screen control
- Canny: Identify the lines of the reference picture to restore the picture to the greatest extent
- Depth: Identify the depth of space, and generate the distance between the object on the screen and the lens and the reference image are similar to that of the reference image.
- Sketch: Recognizes the outline of the reference picture with low fineness. While retaining the outline of the reference picture, AI can freely create it.
- OpenPose: Recognize the character pose of the reference picture, and generate the character pose consistent with the reference picture.
5.2.4 Prompt words
- Positive words:Enter the results you want to get. The richer and more precise the adjectives are, the better the results you generate.
- Negative words: Enter content you do not want to appear in the image to reduce interference with the generated results.
- You can use the “Clear” button in the lower right corner to clear the currently entered prompt word content with one click.
- If no keyword is entered, AI will randomly generate an image for you.
5.2.5 Generate quantity
- The number of generated pictures can be customized, up to 4 pictures can be generated at a time;
5.2.6 Generate results
If the selection is irregular, the result will be generated in a rectangle for better generation~
- Insert layer: Click on the image and it will be inserted as a new layer.
- Delete: Click the Delete button to delete the pictures in the record.
- Download: Click the download button to support saving the image locally.
- Generate again: generate new results with the original parameters.
5.3 Generate similar pictures
Generate an image with a certain degree of similarity based on the selected reference area
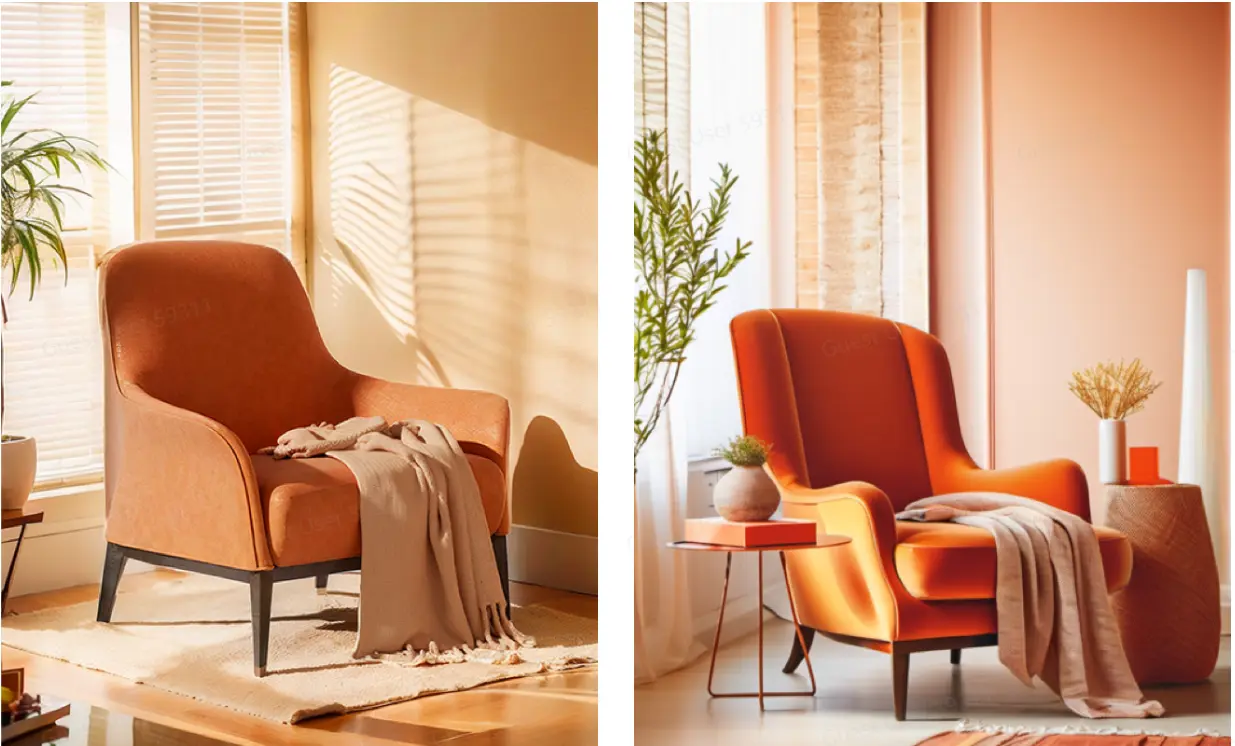
Original image
Effect picture
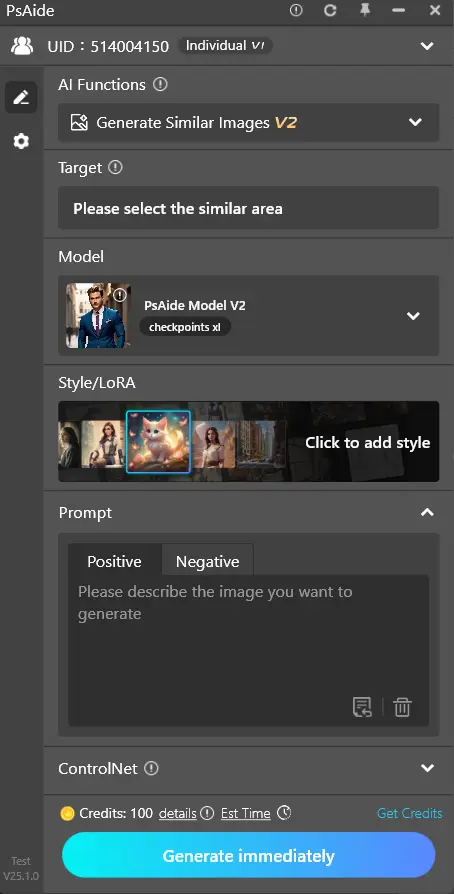
5.3.1 Introduction to the interface
- Objective:The area that needs to be used as a reference.
- Prompt word:Enter your idea and you can generate similar pictures based on the prompts.
- •Generate size: The size of the target selection, which is also the size of the generated graph.
- Advanced settings: More advanced operation adjustments to generate effects.
- Generate results: Used to display the generated image.
5.3.2 Target
- The goal is to select the area you need to refer to on the PS canvas through the selection tool.
5.3.3 Prompt words
- Positive words:Enter the results you want to get. The richer and more precise the adjectives are, the better the results you generate.
- Negative words:Enter content you do not want to appear in the image to reduce interference with the generated results.
- You can use the “Clear” button in the lower right corner to clear the currently entered prompt word content with one click.
- If no keyword is entered, the AI will randomly generate a similar picture for you based on the reference area.
At present, the prompt words only support English recognition. You need to translate manually before entering. We will launch more prompt word assistance functions in the future.
5.3.4 Generate size
- The size of the target selection is displayed, and the generated graph will be generated according to this size.
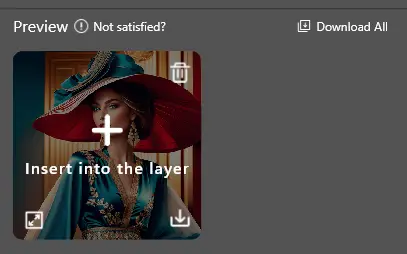
5.3.5 Generate results
If the selection is irregular, the result will be generated in a rectangle for better generation~
- Insert layer:Click on the image and it will be inserted as a new layer.
- Delete:Click the Delete button to delete the pictures in the record.
- Download:Click the download button to support saving the image locally.
- Let’s take another picture:generate a new result with the original parameters.
5.4 Line drawing color
Based on the line drawing in the selection as a reference picture, color the line drawing is combined with keywords, and the line drawing is generated into a color rendering to make the picture come to life.
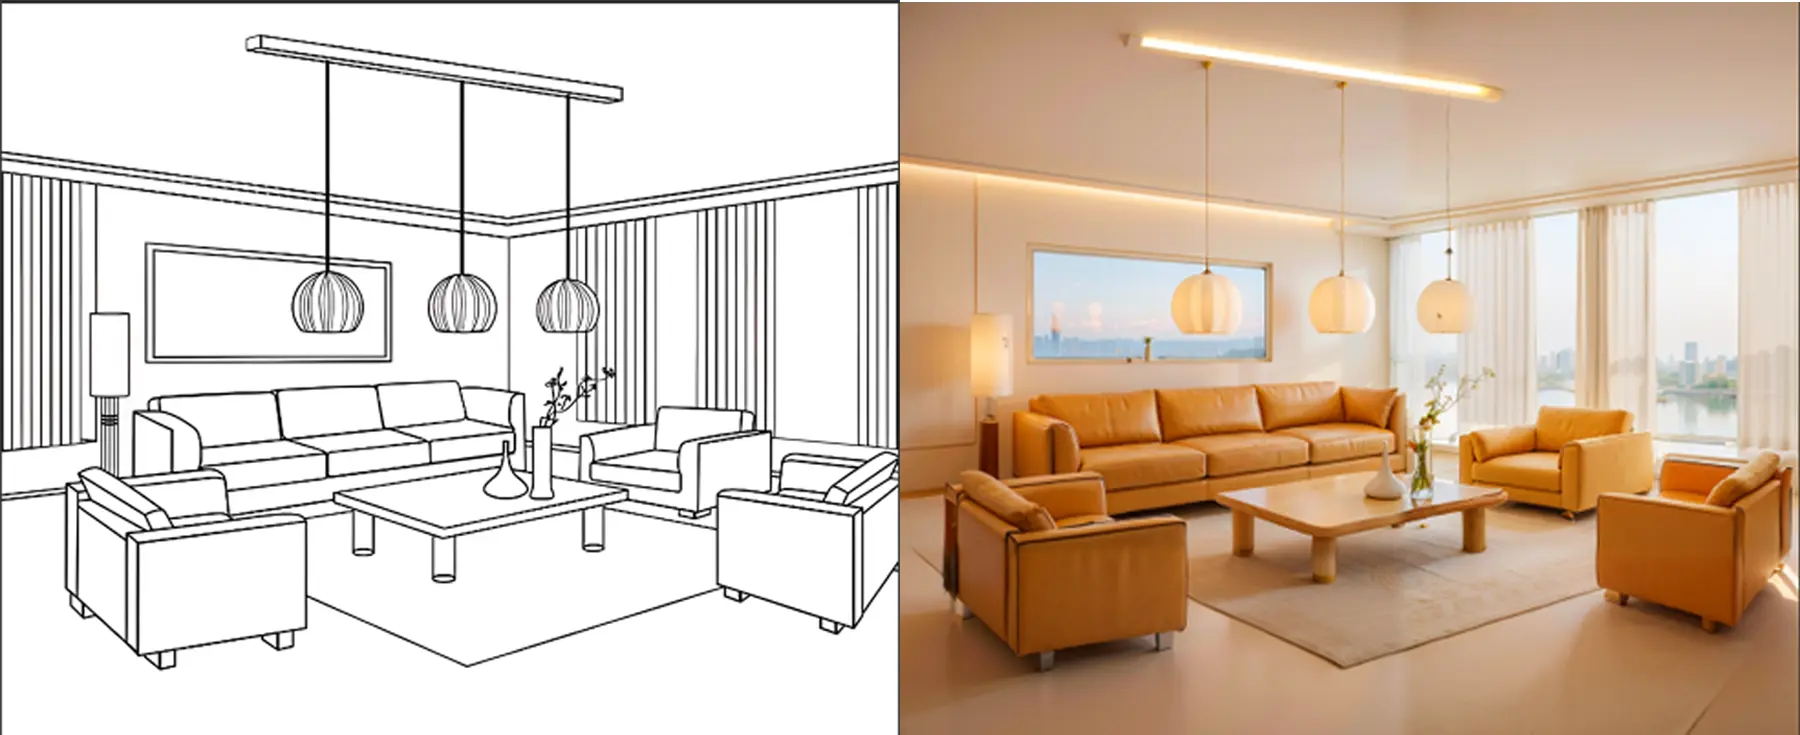
Original image
Effect picture
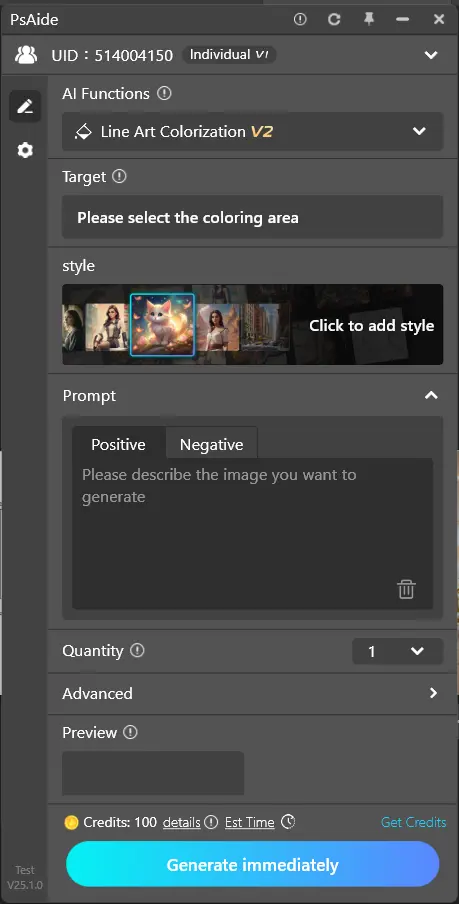
5.4.1 Interface introduction
- Style:Select the style to generate different picture effects.
- Objective:The area that needs to be colored.
- Prompt word: Enter your idea and you can generate pictures according to the prompts.
- Generate size:The size of the target selection, which is also the size of the generated graph.
- Advanced settings:More advanced operation adjustments to generate effects.
- Generate results: Used to display the generated image.

5.4.2 style
- Click to open the style pop-up window and select the style to use with one click.
- Provides hundreds of styles to choose from to intuitively feel the style effect.
- View detailed function introduction
The more relevant the style you choose is to the prompt, the better the result will be~
5.4.3 Target
- The goal is to select the area to be colored through the selection tool on the PS canvas.
5.4.4 Prompt words
- Positive words: Enter the results you want to get. The richer and more precise the adjectives are, the better the results you generate.
The front prompt word can be used to specify style, color, lighting, atmosphere, or other details.
• Negative words::Enter content you do not want to appear in the image to reduce interference with the generated results.
• You can use the “Clear” button in the lower right corner to clear the currently entered prompt word content with one click.
5.4.5 Generate size
- Display the size of the target selection, and the generated image will also be generated according to this size.
5.4.6 Generate results
If the selection is irregular, the result will be generated in a rectangle for better generation~
- Insert layer:Click on the image and it will be inserted as a new layer.
- Delete:Click the Delete button to delete the pictures in the record.
- Download: Click the download button to support saving the image locally.
- Let’s take another picture: generate a new result with the original parameters.
To achieve better line drawing effect, we recommend that you download the ControlNet plug-in in the drawing engine for use.
Click to view the ControlNet plug-in installation tutorial, for learning and use only.
- What is ControlNet?
ControlNet is a plug-in for controlling AI image generation. It uses a technique called “Conditional Generative Adversarial Networks” to generate images. Unlike traditional generative adversarial networks, ControlNet allows users to fine-grained control of generated images. This makes ControlNet very useful in many application scenarios such as computer vision, art design, virtual reality, and more. In short, ControlNet can help users accurately control the generation of AI images for better visual effects.
5.5 Intelligent erase
Easily remove excess objects in the selection with one click.
5.5.1 Interface introduction
•Target:The area where the object needs to be erased.
5.5.2 Target
- The goal is to select areas that require intelligent erasing through the selection tool on the PS canvas.
5.5.3 Generate results
- The generated results are automatically inserted in the form of a new layer.
5.6 Style
Choose from a variety of styles to easily generate a variety of creative images.
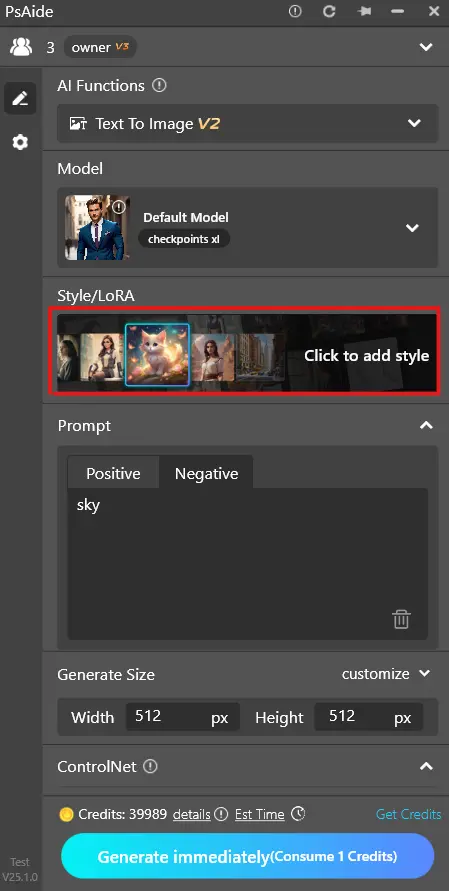
5.6.1 Interface introduction
- Category:Provide popular styles and intuitively experience style effects.
5.6.2 Entrance
- Connect the V2 engine, switch to the text and line drawing functions to display style.
- Click “banner picture” to open the style pop-up window.
5.6.3 Use, replace, delete style
Use:Move the mouse into the style, the “Use” button appears, click to select the style to use, and close the pop-up window at the same time.
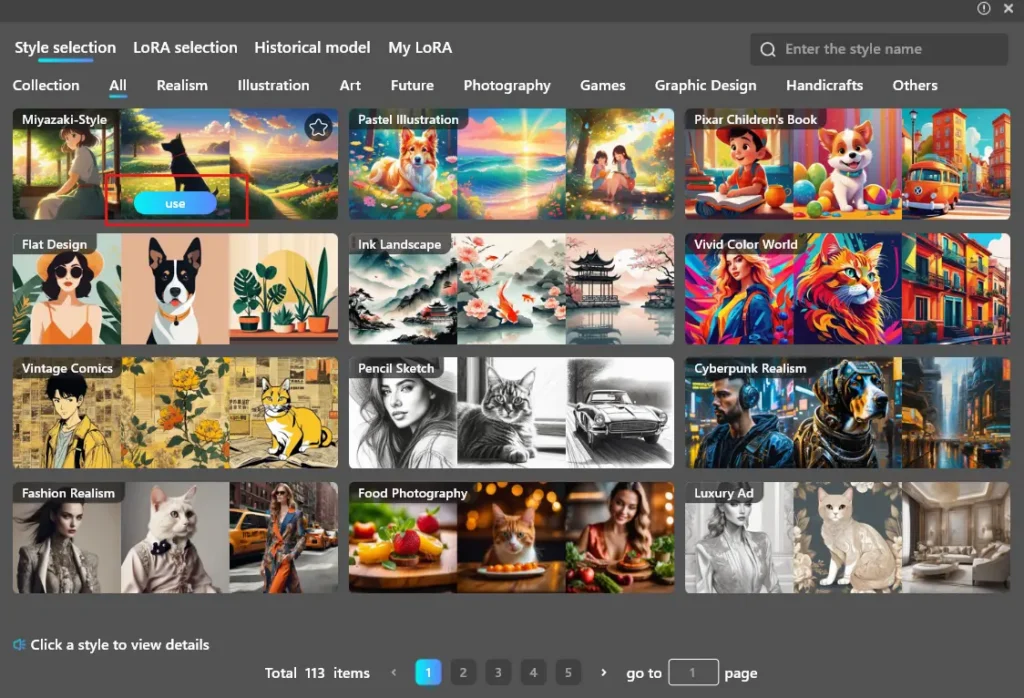
The more relevant the selected style is to the input prompt words, the better the generation effect is~
For example: use the “animation” style, enter the prompt word: “Two-dimensional girl, cute and beautiful portrait”;
Use the “Realistic Food Photography” style and enter the prompt word as: “Cake, close-up, photography photos”.
- Change style: Click the “Replace Style” button to open a pop-up window and change the style.
- Delete: Delete the style in use and restore the default state.

5.7 No background removal needed
5.7.1 Introduction to the interface
- Style:Select different styles to generate different visual effects.
- Call-word:Enter your idea and generate transparent PNG material with one click.
- Generation size:Used to set the size of the generated image.
- Generate the quantity:Used to set the number of images generated.
- Advanced setup:More advanced operations adjust the generation effect.
- Generating results:Used to display generated images.
5.7.2 style
- Click to open the style pop-up window, one-click selection of style use.
- Provides hundreds of styles to choose from and intuitively feel the style effect
- View detailed functional introduction➡️
The more relevant the style you choose is to the prompt, the better the result will be~
5.7.3 call-word
- Positive words:Enter the result you want, and the more precise the adjective, the better the result.
- Negative words:Enter content that you do not want to appear in the image to reduce interference with the generated results.
- You can use the “Clear” button in the lower right corner to clear the current input prompt content with one click.
- If you don’t enter a keyword, the AI will randomly generate a transparent png image for you.
5.7.4 Generation size
- You can customize the size and width, and the height does not exceed 1024*1024;
- If you enable [Follow the Selection], the generated size is the same as the size of the selection, and the generated result can be inserted into the selection with one click.
5.7.5 Generate quantity
The number of images that can be generated is customizable, with up to 10 images generated at a time.
5.7.6 Generate results
If the selection area is irregular, it will be generated as a rectangle for better results.
- Inserting layers:Clicking the image will insert it as a new layer.
- Delete:Click the delete button to remove the image from the record.
- Download :Click the download button to save the image locally.
- Rebuilding:Create a new result from the original parameters.
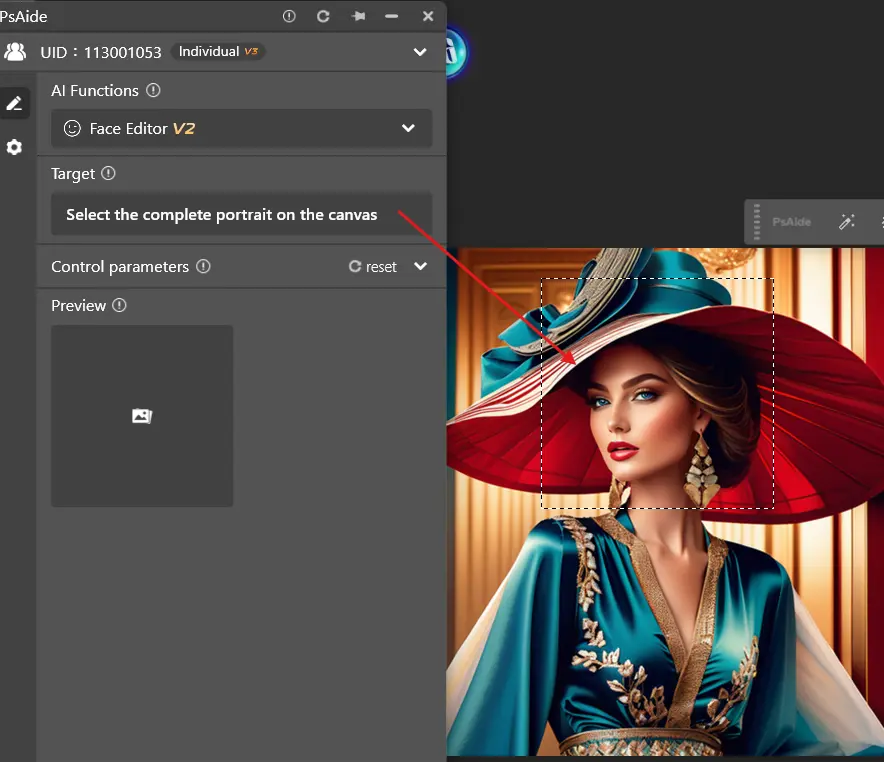
5.8 Facial control
The expression of face can be accurately controlled by adjusting specific parameters.
5.8.1 Interface Introduction
- Target:Used to select target areas where AI functions are required.
- Control parameters:It is used to adjust specific parameters to control the presentation of facial expressions.
- Generating results:Used to display generated images.

5.8.2 Target
- The goal is to use the selection tool on the PS canvas to select the area that needs expression control.
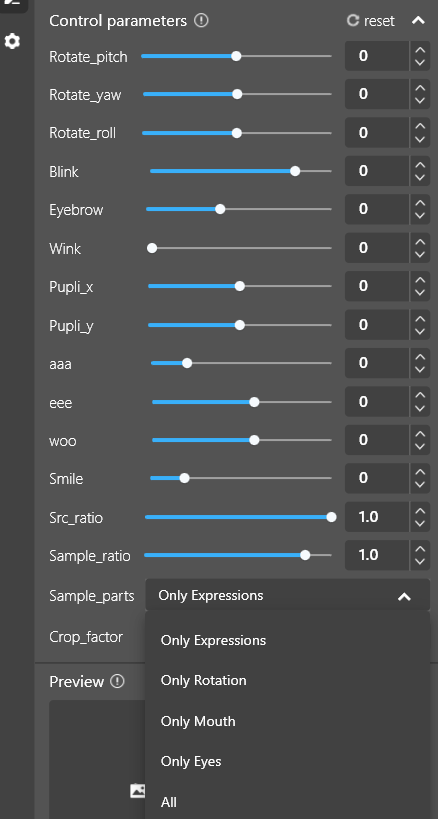
5.8.3 Control parameters
- The value of the head, eyes and mouth can be customized. The higher the value, the higher the presentation.
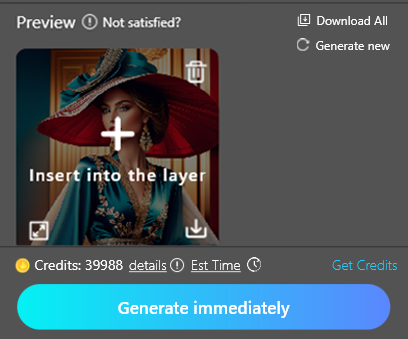
5.8.4 Generating results
- Inserting layers:Clicking on the image will insert it as a new layer.
- Delete:Click the delete button to remove the image from the record.
- Download :Click the download button to save the image locally.
- Enlarge to display:Click the zoom button to view the details of the generated image on a larger screen.
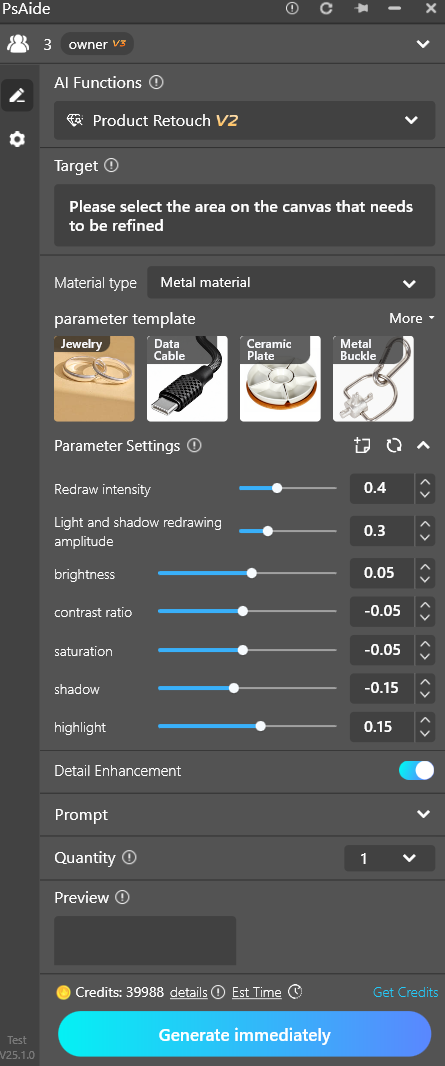
5.9 Product refinement
By parameter adjustment, a more effective product image can be generated
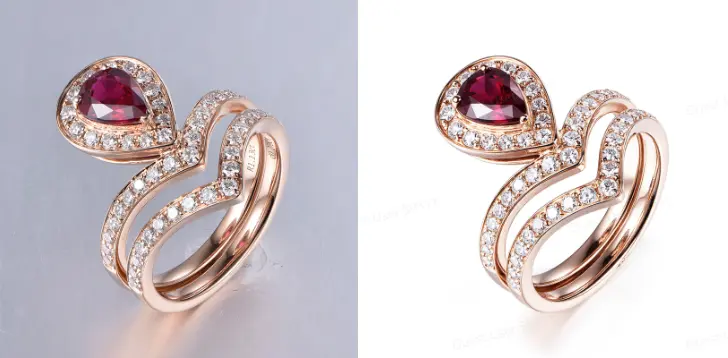
Original image
After re finishing
Note:If the selection area is irregular, it will be generated as a rectangle for better results.
5.9.1 Introduction to the interface
- Target:Used to select target areas where AI functions are required
- Generate the quantity:The more you generate, the longer the wait
- Material Type:General defect removal/Metal material/Re-rendering material
- Parameter adjustment:The smaller the redraw range, the more details the product retains and the greater the degree of modification. Except for the redraw range, other parameters are based on 0 as the baseline. A value less than 0 indicates a reduction, while a value greater than 0 indicates an increase. For details, see the parameter adjustment section below (Detailed Version).
- Enhance Details:Control the detail representation of the generated image. The details will be more delicate when opened. You can turn it off if the image is overexposed
5.9.2 Generate the quantity
- It will generate 1 image by default. You can customize the number of images generated at one time, up to 10 images at a time;
5.9.3 Material type
- General purpose for removing flaws:It can be used to remove defects and refine various types of materials to enhance the gloss of products
- Metal material:Refers to a material with luster, ductility, easy to conduct electricity, heat transfer and other properties, including pure metals and their alloys.
- Reshade material:Redraw the entire product diagram, only retaining the shape, not the details
5.9.4 Parameter adjustment(metal material)
- Redrawing amplitude:Need to keep higher detail, set to 0.2-0.3, need to keep highest detail, set to 0.01
- Light and shadow remastering amplitude:Same stroke width
Suggestion: The following parameters are adjusted within the range of -0.5 to +0.5
- Brightness:Overall brightening or darkening
- Contrast:Lighter areas will appear brighter, darker areas will appear darker. If you want to preserve details in the dark areas, you can adjust it down.
- Saturation:Adjust the saturation of the picture color
- Shadow:When the shadow is enhanced, the highlight is weakened, and when the shadow is weakened, the highlight is enhanced
- Highlight:Can be adjusted in coordination with shadows

Small tips:
When the product details are rich, you can adopt the fusion method of regional local retouching and Ps mask erasure.
In general, you can only adjust the value of the redraw range parameter without changing anything else.
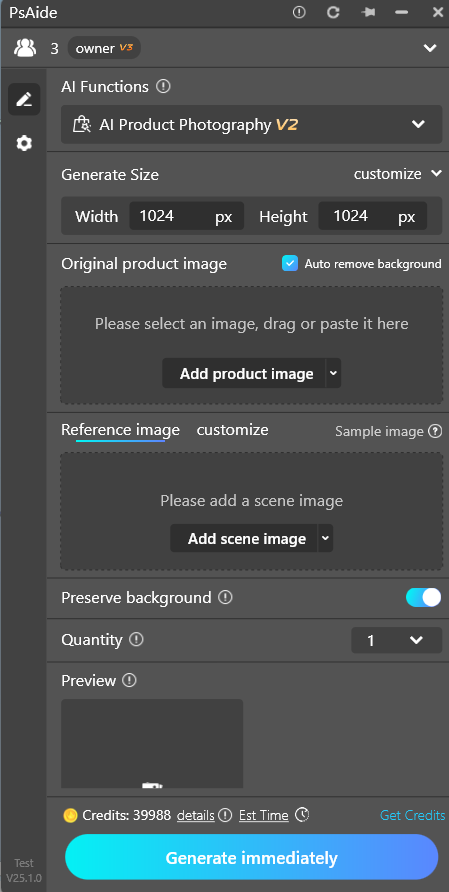
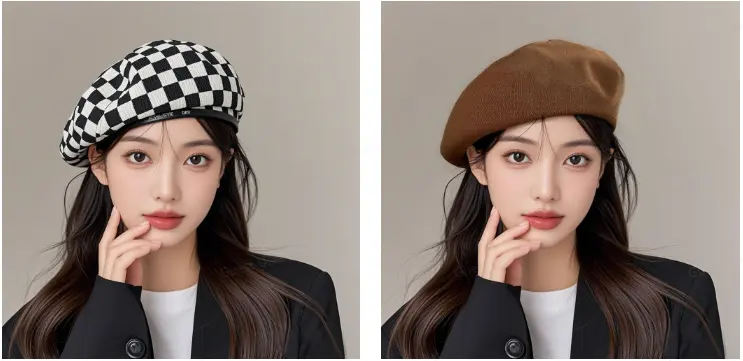
5.10 AI product gallery
By uploading the original image and scene image of the product, you can generate a better product image
5.10.1 Introduction to the interface
- Generate Size:Supports the generation of commodity image sizes for various types such as Taobao, Jingdong, Pinduoduo, Xianyu and Meituan
- Auto background removal:Check this box by default. When you upload a white background product image, the white background will be automatically removed. If you are using a transparent grid non-pullout image, you can leave this option unchecked.
- Original product image:Upload the product/item you need to place
- Select a scenario:You can use the scene diagram of the network material library or upload pictures locally.
- Number generated:The more you generate, the longer the wait
5.11 Migration of all things
By selecting the area to be replaced and uploading the material, you can generate a better product image
Original image
impression drawing
5.11.1 Interface Introduction
- Original image:Select the area to be replaced on the canvas (you can use tools such as lasso, frame, pen and so on to establish the selection area)
- Auto background removal:Check this box by default. When you upload a white background product image, the white background will be automatically removed. If you are using a transparent grid non-pullout image, you can leave this option unchecked.
- File photo:To upload the product/item you need to place, you can upload it through three ways: local addition, layer acquisition and selection
5.11.2 Generation effect
- The generated result will automatically create a new layer and insert the topmost PSD file
If the selection area is irregular, it will be generated as a rectangle for better results.
5.11.3 Click to viewUsage tips
5.12 AI Face Swap
By selecting the area to be replaced and uploading the face picture, a model with good effect can be generated
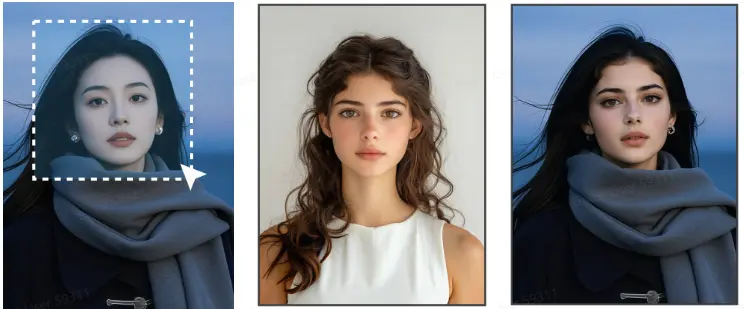
Original image and selection example
The face that will be
replaced
Impression drawing
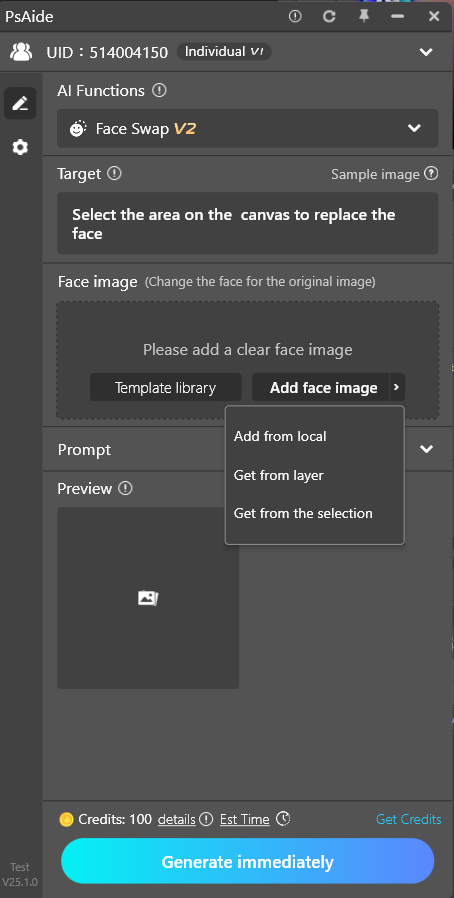
5.12.1 Interface Introduction
- Original image:Select the area to be replaced on the canvas (you can use tools such as lasso, frame, pen and so on to establish the selection area)
- Face map:You can select a face from the template library or upload your own clear face image
There are three ways①Add images directly from the local area,
②From the layers
③From the electoral district
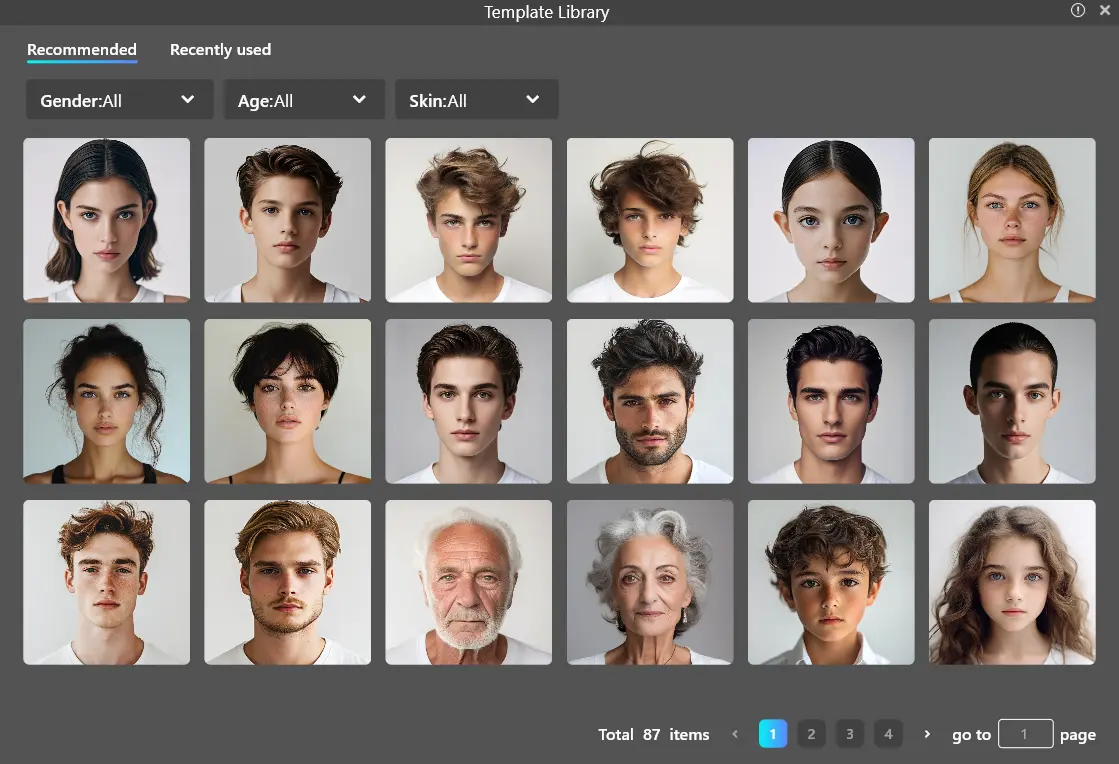
- Template Library:A huge number of face template libraries are available!
- Call-word:If you want to create a heavy makeup, you can write “make it lighter” in the prompt panel as an auxiliary prompt(The prompt may not be written in general)
5.12.2 Generation steps
- First Steps:Upload face (can be uploaded locally, by layer, or by selection)
- The second step:Box the replacement area on the PS canvas,It’s better to select the entire face
–It is recommended that each face be replaced by another
- The third step:Click Generate
5.12.2 Generation effect
- The results are automatically created as a new layer and inserted into the top psd file
If the selection area is irregular, it will be generated as a rectangle for better results.